Webbased programming environment
The Google Earth Engine runs in a webbased programming environment, which means that it is not necessary to download any additional software to get programming. To access the so called ‘Code Editor’, simply browse for https://earthengine.google.com/ and on the upper right side, navigate through the tabs ‘Platform’ → ‘Code Editor’. Alternatively, you can directly access the code editor via https://code.earthengine.google.com/.
Important note: To use the Google Earth Engine, you will need to register a Google-Account and verify it for the Google Earth Engine. In this process, you will be asked about what you will be using the GEE for, if you are working for any kind of institution and if you are planning to use it for commercial matters. The process of verification can take up to weeks, so you better set your account off before you run into important deadlines. You will get a verification email as soon as your account is approved to use the GEE.
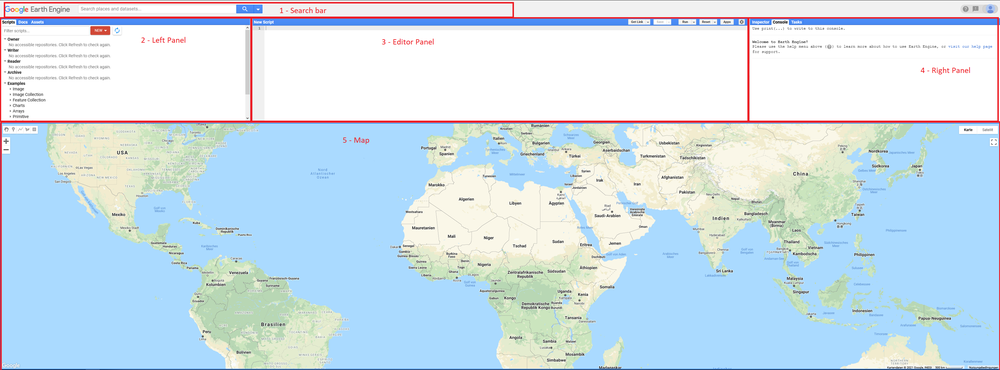
You can see the programming environments visual structure in the figure below.
Basically, there are 5 important sections to identify, whose extents can be adjusted by dragging their borders:
1 - Search bar: here, you can directly search for locations and datasets that are available through the GEE. The desired data can also be directly and comfortably imported into your script.
2 - Left Panel: The upper left panel is mainly for organizing your saved or imported Scripts and Assets, and is divided into three sections accessible by the upper tabs. On Scripts, you can access all of your scripts as well as view lots of ready-to-use example scripts that are accessible from the very beginning. On Docs, you can find the documentation for all of the Earth Engine APIs functions, which means that it works like a comprehensive help-function if you need more information on anything code-related. On Assets, you can upload and manage all of the assets you have uploaded to the GEE, ready to be implemented into your script.
3 - Editor Panel: The panel in the upper middle is the actual code editor. Here, you can write, edit and save your code, share it with others (“Get Link”), as well as run your script by clicking the “Run” button. Imported datasets will always appear at an integrated top section of the editor.
4 - Right panel: The upper right panel grants access to the Inspector, the Console and the Tasks. The Inspector allows to extract information from coordinates, pixel values and layer information from any point you click on the map. The Console contains any output from your print() calls including detailed information, as well as charts and error logs. The tab Tasks lets you manage anything that takes long time to compute, for example exporting large-scale maps you created with your script to .tiff-data.
5 - Map: The Map is located at the bottom part of the browser window. Here, you can view a basemap of the world as well as any of the imagery and geodata that results of your executed script. On the upper left corner, you can find a geometries editor which allows you to create points, lines and polygones, hence allowing you to create shapefiles. On the upper right corner, you can toggle between visualization styles for the basemap as well as fullscreen on/off. On the lower right corner, you can find information on the visualized basemap, as for example the year the image was captured, the scale and the source.
